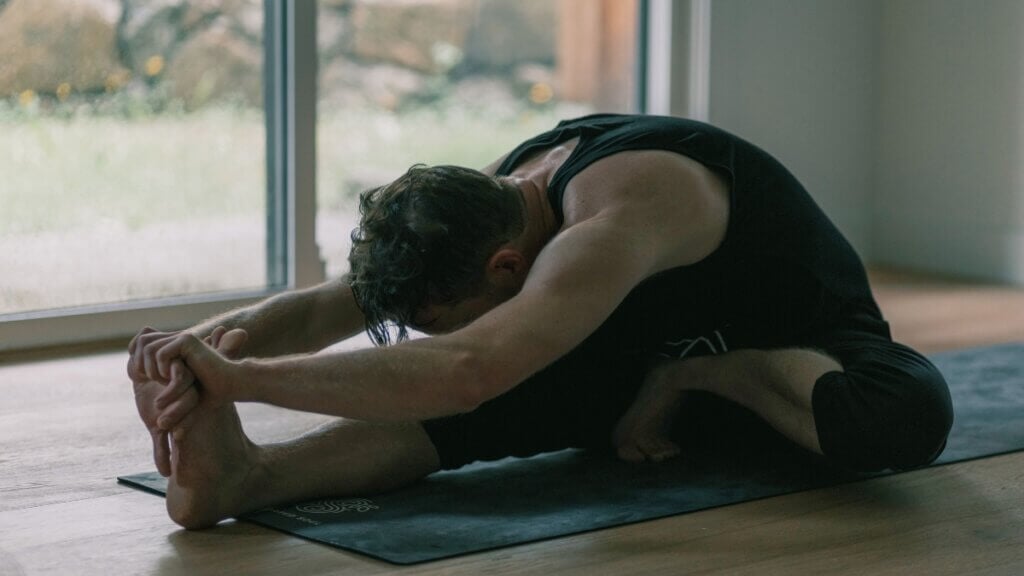
Janu Sirsasana, or Head-to-Knee Pose, is a familiar part of a seated yoga sequence. Its Yin yoga counterpart is Half Butterfly pose. If, like me, you practise Ashtanga Vinyasa, you have probably done it a thousand times. If not, this is a place to start.
We’ll walk through the three Ashtanga variations, A, B and C, and our favourite Yin yoga variation, Half Butterfly. First, though, I want to look at how we set up. The beginning of the pose is often the most important part.
If you have knee, hip, back or foot concerns, read the modifications and joint considerations before practising.
In This Article
- What is Janu Sirsasana?
- Set up Janu Sirsasana before you fold
- Janu Sirsasana A
- Janu Sirsasana B
- Janu Sirsasana C
- Half Butterfly in Yin yoga
- Janu Sirsasana modifications and joint considerations
- Bring it back to the beginning
What is Janu Sirsasana?
The Sanskrit words janu, sirsa and asana refer to knee, head and posture. You may also see the name written Janusirsasana or Janu Shirshasana. In Ashtanga’s Primary Series, A, B and C form a family of asymmetrical seated forward bends. Each is practised on both sides.
- A: the bent foot rests beside the extended leg, with its sole against the inner leg.
- B: the pelvis moves over the bent-leg heel.
- C: the bent foot is upright, with the heel raised and the ball of the foot on the mat.
- Half Butterfly: the related Yin yoga posture uses a quieter, longer hold and allows different directions of folding.
Changing the bent leg changes more than the outline of the pose. It changes the relationship between your foot, knee and hip, and how you arrange your pelvis before folding.
Set up Janu Sirsasana before you fold
When I help someone with a posture, I look at the setup before offering an adjustment. We often see a finished shape and try to fit ourselves into it. I would rather start with where the feet, legs and pelvis need to be so the movement can follow.
Start with your left leg straight and your right knee bent. Before folding, check whether your right hip has slipped behind your left. I aim to bring the hips side by side, facing forwards, so one side of the torso does not have farther to travel than the other.
If one shoulder is higher when you fold, check the hips before trying to lower the shoulder. Sometimes it is easier to sit up, reset the hips and fold again.
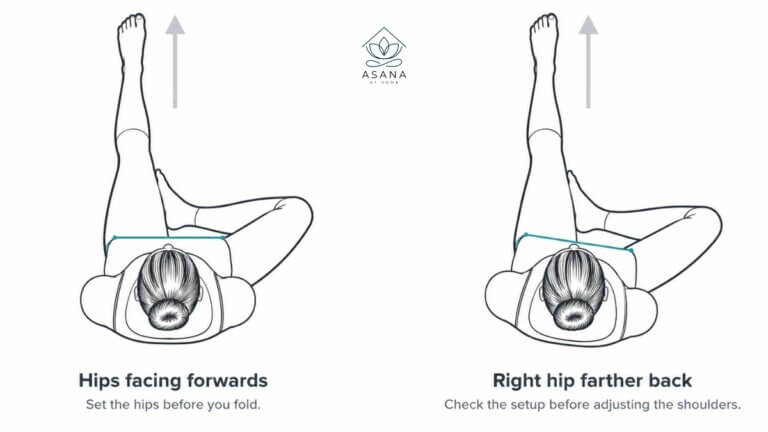
Where does the head go?
Despite the name Head-to-Knee Pose, I don’t teach reaching the forehead towards the knee as the goal. In my approach, the direction is forward, with the head coming towards the inside of the extended leg as the fold deepens.
Think of Paschimottanasana, where you fold forwards between both legs. Janu Sirsasana changes one leg’s position, but I look for a similar direction through the torso. Chasing the knee can pull you sideways or encourage you to round down before you have moved forwards from the pelvis. This is the approach I use; you will encounter other alignment cues in other teaching traditions.
An active grip, without hauling yourself down
In A, B and C, keep the grip and arms active, but let the shoulders stay away from the ears. Feel the shoulder blades draw towards the hips as the back supports the movement. The legs, hips and back participate in the fold; the hands are not there to haul you down.
Janu Sirsasana A
A establishes the basic relationship between the extended leg, bent leg and forward fold. It also explores closing the bent knee, bringing the heel towards the buttock while the hip allows the thigh to open to the side.
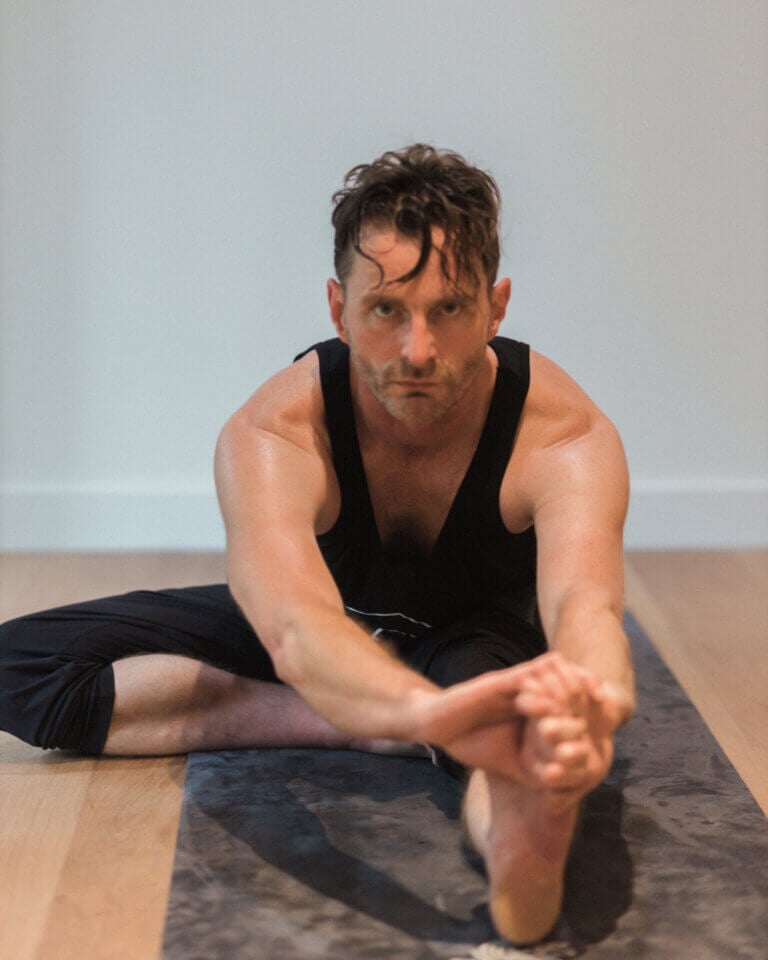
- Sit with the left leg extended. Bend the right knee and bring the right sole against the inside of the left leg, somewhere between the knee and hip. Let the right knee open to the side from the hip.
- Arrange the pelvis before reaching forwards. Aim to bring the hips square to the extended leg without pushing the bent knee down.
- Reach around the left foot. For the wrist clasp I use, the right hand takes the left wrist, with the palms facing forwards, beyond the foot. Keep the extended leg engaged.
- Inhale and lengthen forwards through the torso. Exhale and fold from that setup, continuing towards the inside of the extended leg rather than pulling the head straight down to the knee.
- Stay for five steady breaths in the Ashtanga practice. Keep the grip active and the shoulders away from the ears, without hauling yourself deeper.
- Inhale to lift the chest and lengthen. Release the grip and come upright before changing the leg position. In the Ashtanga sequence, take the vinyasa before practising the other side.
I see A as a very hip-oriented posture. The bent-leg position connects with work you meet in Butterfly and Padmasana, or Lotus Pose. That does not mean pulling the foot closer will prepare you for Lotus. It means paying attention to how the movement comes from the hip while the knee and foot remain comfortable.
Janu Sirsasana B
For B, the pelvis moves over the bent-leg foot. Start with the same left leg extended and right knee bent.
- Place your hands beside you and lift the pelvis enough to move it forwards over the right foot.
- Lower gradually so the right heel comes beneath the perineum, the area at the base of the pelvis between the genitals and anus. Let the heel support the pelvis rather than dropping your weight onto it.
- Check the setup before folding. This position changes the bend of the right knee and the way the pelvis sits over the foot.
- Reach around the left foot, taking the left wrist with the right hand, palms facing forwards. Inhale to lengthen, then exhale into the forward fold.
- Hold for five breaths. Inhale to lift and lengthen, release the clasp, and use the hands to unweight the pelvis before moving off the heel. Take the vinyasa before the other side in an Ashtanga practice.
B brings a different bent-knee position into the seated sequence, including an inward-rotation component in the lower leg. I think of Virasana and Trianga Mukha Eka Pada Paschimottanasana as pose cousins: in those positions, the foot sits outside the hip rather than directly beneath it. The knee, calf and foot relationship helps explain the connection I am drawing. These are related patterns, not identical foot placements.
Janu Sirsasana C
C is the version I find people are most confused about. Often, they plant the ball of the foot first and then try to get the knee down. That makes the entry largely a struggle with the toes.
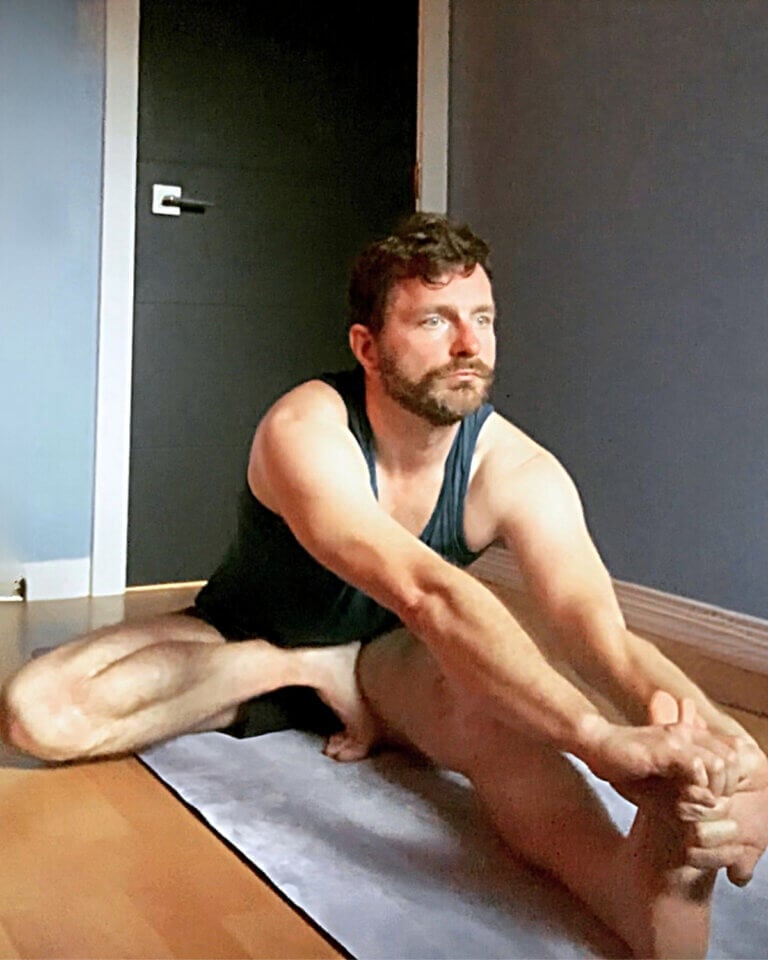
Entering Janu Sirsasana C
I approach it in the other direction: arrange the foot and leg before settling weight into the position.
- With the left leg extended, bend the right knee and bring the right foot towards the inside of the left leg.
- Lift the right heel and let the lower leg roll so the calf turns upwards. Use your hands to guide the lower leg, not force it. A little contact and weight through the foot can help it stay in place as you roll into position. You may need to lift the pelvis slightly to make room for the movement.
- Let the ball of the right foot move towards the mat, with the toes tucked under, heel pointing up and sole facing the inner left leg. Full contact may not be available to you. Let the knee find its available position; do not press it down to complete the shape.
- Settle the pelvis, making a small shift forwards if needed, then reach around the left foot. Take the left wrist with the right hand, palms facing forwards. Inhale to lengthen and exhale to fold.
- Stay for five breaths. Inhale to lift, release the hands and ease the weight off the right foot before releasing it. Another way out is to slide the buttocks away from the foot, then gently straighten the leg. In the Ashtanga sequence, take the vinyasa and repeat on the other side.
How the bent-leg position relates to other poses
The entry matters more than reproducing the finished picture. In my teaching, I think of C as exploring the opposite bent-leg pattern to B. Its pose cousins include Padmasana and leg-behind-head postures. I also see both patterns in Marichyasana B and D, which combine an upright bent leg with a half-lotus leg. These comparisons help explain how I see the postures relating to one another; they are not instructions to twist the shin or a promise that one pose will lead to another.
C is worth learning with a teacher who can see how your hip, knee, ankle and toes are moving together.
Half Butterfly in Yin yoga
Half Butterfly, described in Bernie Clark’s guide, shares the familiar one-leg-extended shape, but the way we use it changes. Rather than the active five-breath hold and vinyasa of Ashtanga, Yin gives us longer in the posture, with less muscular effort.
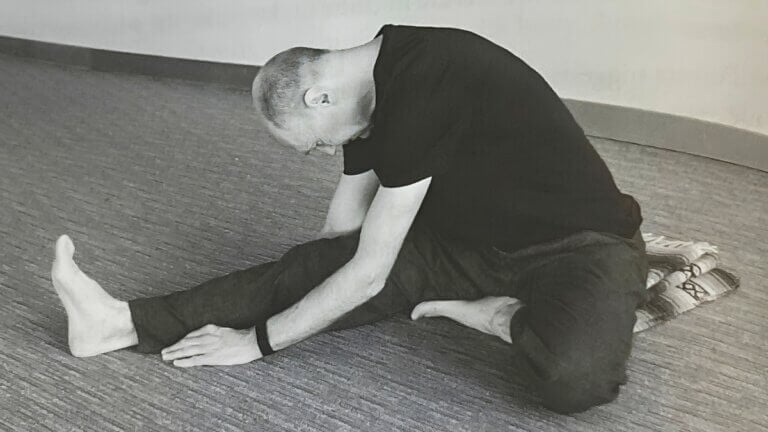
There is also less emphasis on reproducing one fixed alignment. The position of the pelvis, the direction of the fold and the amount of spinal rounding depend on what the teacher and student are exploring. A fold over the extended leg may bring more attention to the back of that leg; a fold between the legs changes the emphasis. The question is where the position is taking you, not simply how closely it resembles Janu Sirsasana A.
How to practise Half Butterfly pose
- Sit with one leg extended and the other knee bent. Bring the bent foot towards the inner leg, leaving enough space for the hip and knee to settle.
- Choose the direction of your fold. Begin over the extended leg, or angle the torso towards the space between the legs for a different emphasis.
- Place the hands on either side of the extended leg, adjusting their position if you change the direction of the fold. Let them support you rather than pull you forwards.
- Ease into a position you can remain in without bracing. The back may round if that is appropriate for you; there is no need to keep reproducing the active Ashtanga shape.
- Stay with the breath and notice how the sensation develops. Around three minutes is one possible hold, rather than a requirement. Use less time when that is enough, and come out sooner if the sensation becomes sharp or uncomfortable.
- Press into the hands to come upright slowly. Help the bent leg out with your hands if needed, then pause with both legs relaxed before changing sides.
Changing the emphasis
Sometimes the straight leg’s hamstrings dominate the experience. Bending and supporting that knee reduces the demand on the hamstrings and may make it easier for the pelvis to tilt forwards. That can make other areas, such as the hip or back, more noticeable. It does not remove the hamstrings from the posture entirely.
Yin and Ashtanga are not a simple split between fascia and muscles. Both involve connective tissues and muscles. The useful distinction here is how much effort you use, how long you stay and what you want the position to explore. See our Yin yoga guide for more on that approach.
Janu Sirsasana modifications and joint considerations
Use a strap for the forward reach
If the wrist clasp is not available, put a strap around the extended foot and hold it with both hands. Give yourself enough length to move forwards from the pelvis rather than rounding down simply to reach the foot. Think of the direction towards the foot, not just bringing the head closer to the leg. The strap helps you maintain that relationship; it is not a way to pull yourself into a deeper fold.
Sit at the edge of a chip foam block
A chip foam block is one of the most useful tools I have found for encouraging the pelvis to tilt forwards. I use it in Ashtanga as well as in Yin, including in Paschimottanasana.
Perch on the front edge rather than sitting fully on top. Let the foam support and lift the buttock tissue behind the sitting-bone area, with the sitting bones close to or just beyond the front edge. Use only enough height and support to feel the pelvis tip forwards while you remain stable. This is a small setup adjustment, not an invitation to tip off the block.
Support the bent leg or soften the extended knee
If the bent leg hangs uncomfortably, place a folded blanket or block beneath the outer thigh or knee so it has support. In A and Half Butterfly, moving the bent foot farther from the pelvis may also make the setup more workable.
A small bend in the extended knee can reduce the hamstring demand. In Yin, support that bend with a rolled blanket or bolster so you can settle without holding the leg up. A bolster beneath the torso can also reduce how far you fold.
Knee, hip, foot and back concerns
B and C can both bring on knee pain, so go gently. A bent knee allows some rotation of the lower leg, but the available range varies from person to person. Anatomy, current mobility and practice history all matter; practice does not make every position available to every body.
Do not force the knee down to compensate for a hip or foot position that is not available. B adds pressure through the heel and a deeper folded-leg position. C adds a demanding foot and toe position. If either produces knee or other joint pain, unweight the position and come out rather than trying to adjust it under load or push through the pain.
Stop for sharp pain, pinching, tingling or numbness. Do not use a strap or another person’s pressure to force the fold. If you have an injury, recent surgery or a health condition affecting these movements, work with an appropriately qualified teacher and your healthcare professional on a suitable variation. A deeper or longer forward bend is not automatically the right choice for a back condition.
Bring it back to the beginning
Whether you are practising A, B, C or Half Butterfly, notice what happens before you fold. Where is the pelvis? How is the bent leg arranged? What direction are you asking the torso to move?
If the pose feels awkward, coming out and setting up again may be more useful than working harder inside it. That is where I begin when teaching these postures, and it is often where the most useful change happens.
To explore the quieter variation in a guided practice, browse our Yin yoga classes.
Frequently Asked Questions
No. In the approach described here, the torso lengthens forwards and the head moves towards the inside of the extended leg. Making head-to-knee contact is not the goal.
The bent foot changes position. In A it rests against the inner leg. For B, the pelvis moves over the heel. C brings the heel upwards while the ball of the foot moves towards the mat. Those differences change the setup before the forward fold.
They are related shapes, but Half Butterfly uses a Yin approach: less muscular effort, longer holds and more variation in the direction of the fold. Holding an Ashtanga version longer does not by itself establish that approach.
The Ashtanga versions are held for five breaths on each side, with vinyasas in the sequence. Half Butterfly is usually held longer; around three minutes is one option, adjusted to the person and practice.