Home » Yoga Blog » Yoga Poses » Supported Bridge Yin Yoga Pose: A Gentle Backbend Guide
Supported Bridge Yin Yoga Pose: A Gentle Backbend Guide
Supported Bridge Pose is a gentle Yin Yoga backbend that supports the sacrum, lower back, spine, hips, and front body. Practiced with a block, bolster, or folded blanket under the pelvis, the pose allows the body to rest into the shape rather than hold it with effort.
- By: Kevin Parenteau
- Published:
- Reviewed: June 25, 2026

Supported Bridge Pose (Setu Bandha Sarvangasana): Overview
Supported Bridge Pose is a reclined backbend where the pelvis rests on a prop while the feet stay grounded and the front body opens.
The active version of Bridge Pose is often known by its Sanskrit name, Setu Bandha Sarvangasana. In Yin Yoga, the supported version is usually softer and more passive. Instead of lifting and holding the hips with muscular effort, you place a prop under the sacrum or back of the pelvis and allow the body to settle.
Supported Bridge Pose mainly targets the sacrum, lower back, spine, front of the hips, abdomen, ribs, and chest. Depending on the height of the prop and the position of the legs, it can feel like a mild restorative shape or a stronger Yin backbend.
This pose often fits well in the middle or near the end of a Yin Yoga sequence, especially after forward folds or hip-focused poses. It can also be useful before Reclining Twist or Savasana to help the body move toward rest.
How to Do Supported Bridge Pose in Yin Yoga
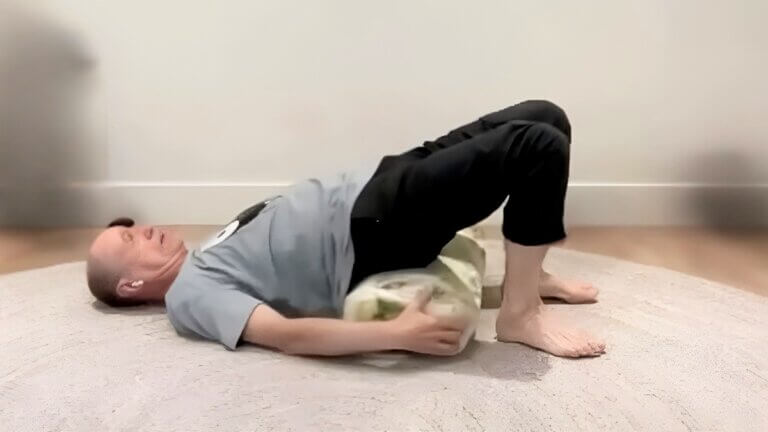
- Lie on your back with your knees bent and your feet flat on the floor, about hip-width apart.
- Press gently into your feet and lift your hips just enough to slide a block, bolster, or folded blanket under your pelvis.
- Place the prop under your sacrum or the back of your pelvis, not directly under the most sensitive part of your lower back.
- Let your pelvis rest fully on the prop. Keep your knees bent and your feet grounded.
- Relax your arms beside you, rest your hands on your belly, or open your arms out to the sides.
- Hold for 3 to 5 minutes, or start with 1 to 2 minutes if you are newer to the pose.
- To come out, press into your feet, lift your hips slightly, remove the prop, and slowly lower your spine back to the mat. Pause before moving on.
In Yin Yoga, the goal is not to push into the deepest backbend. Choose a prop height that lets your breath stay easy, and your lower back feel supported.
Supported Bridge Pose Video Tutorial
In this short video, Bernie Clark demonstrates Supported Bridge Pose, including how to use props under the pelvis so the body can settle into the backbend with support.
Benefits of Supported Bridge Pose
Supported Bridge Pose gives the body a chance to experience a backbend without having to work hard to stay there. The support underneath the pelvis allows the front body to open while the back body has something steady to rest on.
Physical Benefits
- Supports the sacrum and lower back: When the prop is placed properly, the Supported Bridge can provide steady support around the sacrum, pelvis, and lower spine.
- Encourages spinal extension: The pose places the spine into a backbend without requiring the back and leg muscles to support the body.
- Opens the front of the hips: Supported Bridge can gently stretch the hip flexors, especially when the pelvis rests comfortably on the prop.
- Creates space through the chest and ribs: Depending on the arm position, the Supported Bridge can open the chest, ribs, and upper back without forcing the shoulders.
- Balances forward folding: After poses like Caterpillar, Butterfly, or Child’s Pose, the Supported Bridge gives the spine a different movement direction.
- Encourages rest: Because the body is supported by the floor and props, this pose can feel calming when the setup is comfortable.
Energetic Benefits: Meridians & Chakras
In Yin Yoga, the Supported Bridge Pose is often associated with the Kidney and Urinary Bladder meridians because of the sensation through the sacrum, lower spine, and back body.
When the pose creates a stretch through the front of the thighs, lower belly, or hip flexors, it may also affect the Stomach and Spleen meridians. If the arms are raised overhead, the pose may engage the Heart and Lung meridians through the chest, shoulders, and inner arms.
Energetically, the Supported Bridge can feel open, steady, and spacious. At the chakra level, it is commonly associated with the Heart Chakra because of the chest opening, while the support under the pelvis can also lend the pose a grounded quality.
As always, energetic effects are personal. Some students experience Supported Bridge as uplifting, while others simply appreciate it as a quiet, supported backbend.
Contraindications & Safety Tips
Supported Bridge Pose is usually accessible, but it is still a backbend and should be approached with care.
Modify or avoid this pose if you have:
- Low-back pain or spinal sensitivity: Use a lower prop, shorten the hold, or choose a gentler position. If the pose creates pinching or compression in the lower back, come out.
- Hip arthritis or hip replacement: The Supported Bridge may place too much stress on the hips or pelvis for some students. Use a very low version or skip the pose if it does not feel appropriate.
- Neck or disc issues: Keep the neck neutral and avoid turning your head while in the pose. If you have neck or back disc concerns, use caution and keep the setup mild.
- Knee discomfort: Keep the feet grounded and knees comfortably bent. If the knees feel strained, try placing a block or folded blanket between the thighs for support.
- Pregnancy: This pose may not be ideal, especially later in pregnancy, as it involves lying on the back. Choose another supported shape if needed.
- Uncontrolled high blood pressure, glaucoma, detached retina, or vertigo: Because the pelvis may be slightly elevated and the pose has a mild inversion-like quality, use caution or avoid the pose if this position does not feel appropriate.
- Tingling in the hands or arms: If the arms are overhead and you feel tingling, numbness, or an electrical sensation, lower the arms and rest them beside the body.
A good rule for this pose: the support should make the shape feel easier, not more stressful. If the lower back feels pinched, the neck feels strained, or the breath becomes tight, lower the prop or come out.
Pose Modifications & Variations
The supported Bridge Pose can be adjusted by changing the height of the prop, the position of the legs, and how much support you use under the spine and pelvis.
Supported Bridge Pose with Different Props
A Yoga block gives a clear lift under the pelvis and can be used at its lowest or middle height.
A bolster offers broader support and may be more comfortable for longer holds.
A folded blanket is a good option if a block feels too firm or too high.
You can also place a folded blanket under your head if your neck feels strained, or under your shoulders if your upper back needs more support.
Read 8 Yoga Props That Support Your Yin Practice to learn more.
Beginner-Friendly Variation
Use a folded blanket or low bolster under the pelvis and keep the knees bent. Let the feet stay grounded and place them slightly wider than the hips if that feels more stable.
You can also let the knees rest toward each other. This reduces effort in the legs and can make the pose easier to hold.
Straight-Legged Supported Bridge
For a stronger front-body stretch, extend one leg at a time, then possibly both legs long on the mat. You can also bind the legs together with a yoga strap around the thighs or ankles to help keep them aligned and reduce effort.
This variation can increase the stretch through the hip flexors, thighs, abdomen, and front of the pelvis. Move slowly, and extend the legs only if the prop feels stable and the lower back remains comfortable.
If the lower back feels compressed, the pelvis feels unstable, or the breath becomes tense, return to the bent-knee version.

Deeper Variation
For a deeper version, use a block on a higher setting or stack multiple blocks under the sacrum. Keep the knees bent at first and give your body time to adjust before changing the leg position.
This version can create a stronger backbend through the spine and a more noticeable opening across the front body.
For Yin Yoga, deeper is not automatically better. The best version is the one you can stay in without gripping, bracing, or waiting for it to be over.
Muscles, Joints & Target Areas
The supported Bridge Pose mainly works through the sacrum, spine, front body, hips, and chest.
Primary target areas:
- Sacrum and lower back
- Front of the hips
- Abdomen
- Chest and ribs
- Spine
- Thighs, depending on the leg position
Common anatomical focus:
- Lumbar spine
- Sacrum and pelvis
- Hip flexors
- Psoas and iliacus
- Quadriceps, especially in the straight-legged variation
- Rectus abdominis
- Intercostal muscles
- Thoracic spine
- Chest and shoulders, especially if the arms are overhead or wide
In Yin Yoga, the longer hold gives the body time to settle into the supported backbend. The emphasis is not on strengthening the glutes or back muscles, as in an active Bridge Pose, but on allowing the spine and front body to respond slowly with support.
Beginner Tips for Practicing Supported Bridge Pose
- Start with a low prop. A small lift is often enough.
- Make sure the prop is under the sacrum or back of the pelvis, not digging into the lower back.
- Keep your feet grounded and knees bent unless you are very comfortable extending the legs.
- Avoid turning your head while in the pose.
- Let your jaw, belly, and shoulders relax.
- Come out slowly. After several minutes in a backbend, the spine may need a moment before moving into the next shape.
The supported bridge should feel steady and spacious. If your lower back feels pinched, your breath becomes tight, or you feel strain through the neck or hips, lower the prop or come out.
How Long Should You Hold Supported Bridge Pose?
In a Yin Yoga practice, the Supported Bridge Pose is commonly held for 3 to 5 minutes.
Beginners can start with 1 to 2 minutes, especially if the lower back, hips, or neck feel sensitive.
More experienced students may stay longer if the setup is comfortable and the breath remains easy. Longer holds are unnecessary if the body is already providing clear feedback.
Use a timer so you can relax into the pose without watching the clock.
When to Practice Supported Bridge Pose
Supported Bridge Pose is ideal when you want a gentle backbend that requires little effort.
After forward folds such as Caterpillar, Butterfly, or Child’s Pose, bring the spine into the opposite movement.
Use it after hip-focused poses such as Dragon, Saddle, or Half Butterfly to open the front of the hips.
Before the Reclining Twist, to help the spine transition out of a backbend.
Use it near the end of practice when you want a supported shape before Savasana.
It can also be practiced on its own when you want a simple supported backbend for the chest, hips, and spine.
Counterposes for Supported Bridge Pose
After the Supported Bridge Pose, give your body time to return to neutral before moving on.
Good counterposes include:
- Constructive Rest: Lie on your back with your knees bent and feet on the floor. Let the knees fall toward each other and allow the lower back to settle.
- Knees to Chest: Hug your knees in gently to release the lower back after the backbend.
- Reclining Twist: Let both knees fall to one side to bring gentle rotation into the spine.
- Child’s Pose: Fold forward with support under the torso for a quiet counterpose to the back body.
Stay in your counterpose for 30 seconds to 1 minute before continuing.
Related Yin Yoga Poses
If you enjoy the Supported Bridge Pose, these related poses may also be useful:
- Sphinx Pose: A gentle Yin backbend that opens the front body while the forearms support the upper body.
- Seal Pose: A stronger backbend variation that increases extension through the spine.
- Saddle Pose: A deeper front-body stretch that works the thighs, hip flexors, and spine.
- Reclining Twist: A useful counterpose after backbending that helps the spine rotate and settle.
- Child’s Pose: A grounding forward fold that can help the back body soften after the Supported Bridge.
These poses can be linked together for a simple Yin Yoga sequence focused on the spine, hips, and front body.
Supported Bridge Pose FAQ
What is Supported Bridge Pose in Yin Yoga?
Supported Bridge Pose is a reclined backbend where the pelvis rests on a block, bolster, or folded blanket. In Yin Yoga, the pose is held quietly for several minutes so the sacrum, spine, front body, hips, and chest can gradually soften into the support.
What are the benefits of Supported Bridge Pose?
Supported Bridge Pose can help support the sacrum and lower back, encourage gentle spinal extension, and open the front of the hips, chest, ribs, and abdomen. It can also be a useful counterpose after forward folds when practiced with enough support.
How long should you hold Supported Bridge Pose?
Most students can hold the Supported Bridge Pose for 3 to 5 minutes in a Yin Yoga practice. Beginners may prefer 1 to 2 minutes at first. Come out earlier if you feel sharp pain, lower-back pinching, neck strain, or discomfort that increases as you stay.
Is Supported Bridge Pose safe for beginners?
Yes, the Supported Bridge Pose can be beginner-friendly when the prop is low and comfortable. Start with a folded blanket or a block on its lowest height, keep the knees bent, and make sure the lower back feels supported rather than compressed.
What should I do if Supported Bridge Pose feels uncomfortable?
First, lower the prop or move it slightly so it supports the back of the pelvis more comfortably. Keep the knees bent and feet grounded. If the discomfort feels sharp, pinchy, or stressful in the lower back, neck, or hips, come out and choose a gentler pose.
Supported Bridge Pose is a quiet way to explore backbending without forcing the body to hold itself up. With the right support, it can create space across the front body, give the spine a different shape, and offer a steady place to breathe before moving back toward rest.
Practice Yin Yoga with us
Join Bernie Clark and Diana Batts for their weekly live online Yin Yoga Classes, or practice with their recordings. Available in the Welcome to the Yinside Subscription.

Kevin Parenteau

You Love Yoga, We Love Yoga—Let’s Stay Connected
Get yoga tips, a little inspiration, and friendly emails—because yoga is better with friends.
🔒 No spam. No selling your data. Ever.